A button mapping is a text file that tells RetroX which button or key will be sent to the emulator when you press a button in your gamepad or touchscreen controller.
Games included with RetroX don’t need mappings, we already have done that work for you and the appropriate mapping will be installed automatically. If you want to change the button mappings for your game, or your game is not supported, continue reading.
RetroX uses a “standard” gamepad layout. This layout is based on the Super Nintendo gamepad layout and it is expanded with additional buttons available in controllers like the Playstation and XBOX ones.
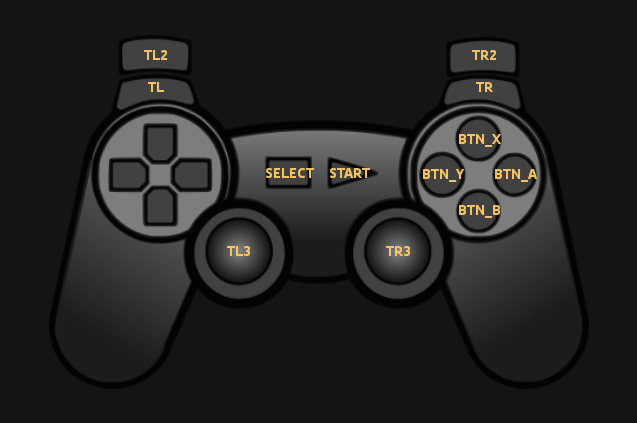
RetroX gamepad layout
Some games for computer platforms like Atari, MS-DOS, MSX or Amiga were designed to be played with a keyboard and/or a joystick with one or two buttons. As this gamepad layout supports up to 10 buttons, you can assign those additional buttons to send key events, for example pressing the SPACE bar, the ESC key or any other key that the game requires.
For example, the default configuration for Atari XL/XE is to have all the main buttons mapped to the original Atari joystick trigger button, but if your game needs a SPACE key, then you can reassign any button to the SPACE key for Atari with a line like this:
BTN_X = ATR_SPACE
With that line, when you press the BTN_X button in the “standard” layout, the emulator will receive the SPACE keypress.
In the games supported by RetroX we have improved some games controls adding a special button for “jump”. In those games where you jump moving the dpad up, we simply mapped the up action to the BTN_A key, so for example the user now can fire with the BTN_B and jump with BTN_A, something that were not supported in the original game.
This is an example for this case in Atari:
BTN_A = ATR_UP
Configuration files
RetroX will look for some specific file names to get the button mappings configuration. Those names are:
keymap.1.conf: Button mappings for Gamepad of Player 1 (optional)
keymap.2.conf: Button mappings for Gamepad of Player 2 (optional)
keymap.conf  : Button mappings for Gamepad of Player 1 (use this simple name if there is only one player)
Those files must be in the folder containing the game.
If you are using more than one game per folder, you need to use the game name plus the configuration file name, consider this case as an example for the games named stealth.atr and zaxxon.atr in the same directory
stealth.atr
stealth.atr.keymap.conf
zaxxon.atr
zaxxon.atr.keymap.conf
Testing
You may need to test several times before getting the desired configuration. You can use this process for testing:
- Create or modify the keymap.conf file
- Select and run the game
- Test the game
- If the you need to make a change, press the Home button to reset the config
- Go back to step 1
Specific button mappings configurations
Read the following document about specific button mapping configurations for some platforms